Saturday, March 4, 2017

Mindlink pt. 3, Wave X edition

Jankattanni


In my last two posts, I talked about various ways that Mindlink can be used, and some general staples for list building with Mindlink. In case you don't want to read it, at least three ships and probably Manaroo were the two conclusions I made. I have been flying a lot of Parattanni lately, and have really fallen in love with the Shadowcaster. But, I haven't been a huge fan of Fenn because I feel people are getting really good at tech-ing against him with Gunner/Vader/Kylo/bombs/Swarm leader/Range 2 shots. So, I have been branching out again and have found a really fun squad template with the new Quadjumper in it.

My first attempt was:


  • Asajj Ventress
    • Attanni Mindlink
    • Latts Razzi
  • Sarco Plank
    • Attanni Mindlink
    • Unkar Plutt
    • Pattern Analyzer
    • Spacetug Tractor Array
  • Manaroo
    • Attanni Mindlink
    • Extra Munitions
    • Plasma Torpedoes
    • 4-LOM
    • R4 Agromech
    • Guidance Chips
This is a great platform to learn the Quadjumper on, as it is still giving you a lot of control with Asajj and Manaroo has some teeth. But, after a few games with it, I started realizing that what I really need is a way to truly capitalize on the free tractor beam. I talked with the fine people of Outflank Games about it and have been playing around to some surprising success with

Jankattanni


  • Contracted Scout
    • Attanni Mindlink
    • Extra Munitions
    • Proton Torpedoes
    • Boba Fett
    • R4 Agromech
    • Guidance Chips
  • Manaroo
    • Attanni Mindlink
    • Extra Munitions
    • Plasma Torpedoes 
    • 4-LOM
    • R4 Agromech
    • Guidance Chips
  • Consable Zuvio
    • Attanni Mindlink
    • Ketsu Onyo
    • Conner Net
    • Pattern Analyzer
    • Spacetug Tractor Array
This list is probably the most fun that one can have playing X-Wing while still being able to stand against the current meta. I started with K4 and unhinged on Manaroo instead of Ketsu/4-lom/R4, but realized that Zuvio needed something more, and that I was generating so many focuses on Manaroo that R4 would have just refreshed my target lock each time.


The Combo

Okay, the basic combo of this list is that Contracted Scout and Manaroo get target locks from R4 Agromech onto any target. Then, both ships turn around or get in position to launch their torps off next round. Zuvio drops a Conner Net, reverses, and tractor beams. Zuvio probably has a range 1 shot to take, Manaroo fires plasmas, and then the Contracted Scout fires the Proton Torpedo to kill the target or Boba Fett some clutch upgrade off the ship. The ship is also Ion-d so you know where it will be next turn to do it all again if need be. 

My initial thought was this would never work, but it is actually pretty easy in a non PTL meta to know where a ship will be. The best part is that the enemy pretty much has to take out Manaroo or the Scout first, as they have the most points and Zuvio really can't close out a game by himself. That means that Zuvio will have more than one chance to get that Tractor Beam off. Flying Zuvio takes a little getting used to, as you will move after most defenders. But, they are predictable enough to find. He can just walk up to all the 8-9 pilot skill ships and Tractor Beam them before they move. 

Opening Position

If you have read any of my Echo posts, you would know that I am really into having set opening plans. Here is Jankattanni's opening. 

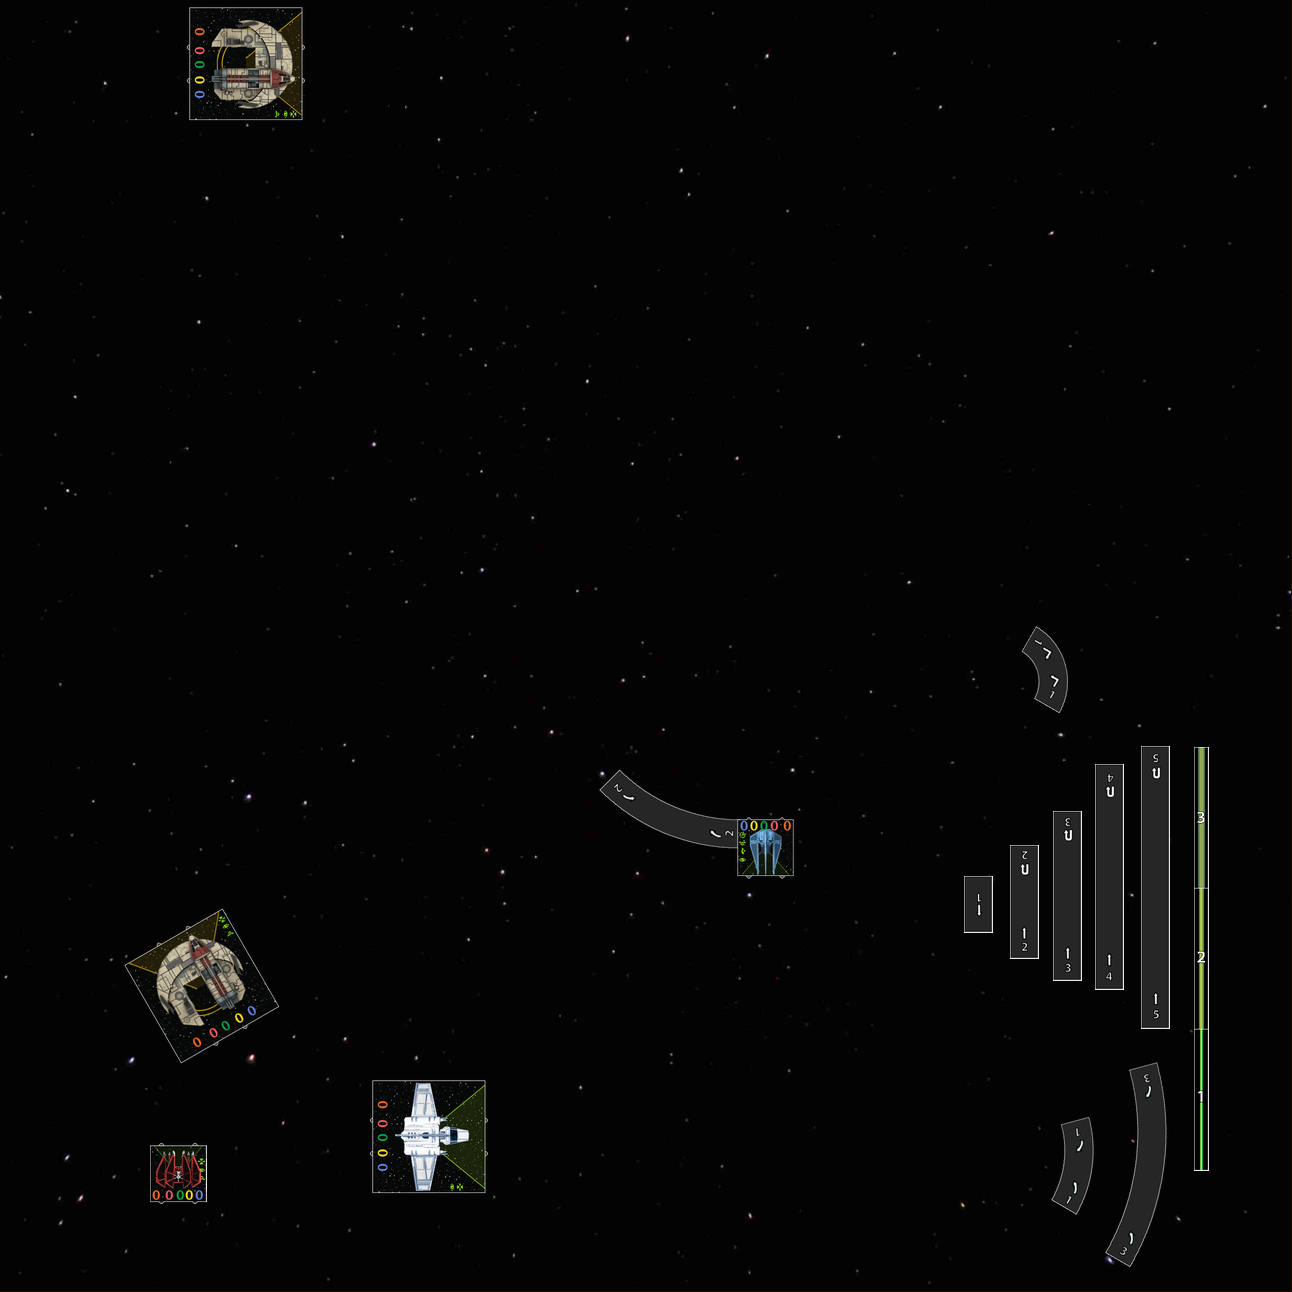
I like to set up the Scout closest to my right most obstacle. Manaroo is just next to the Scout, and Zuvio is facing Manaroo and is along her back edge base.  

Next, I like to do a 2 straight with both ships, and a 2 hard for Zuvio. This speed will change depending on obstacle placement and opponent, but the 2 forward is safe enough to default to. If you do 1 straight, then Zuvio has to do a 1 hard as well. if you do a 3 or 4 straight, Zuvio has to do a barrel roll after the 2 hard.


Next part of my opening is my first engagement. So, lets assume that my opponent rammed in for a R2-3 shot against Manaroo. I'm going to do a 1 bank with the Scout, and a 3 bank with Manaroo & Zuvio. This will hopefully let me push out some munitions onto my opponent.


The next step is the best one. Once your opponent begins to turn around for the reengagement, have your Scout and Manaroo do a 2 white Sloop. The If your formation was tight, the Scout might have to barrel roll to not bump Manaroo. To punish the aggressive 4-white-K turn of the defenders, Zuvio will reveal a reverse maneuver, drop his bomb out his front, and then reverse + Tractor beam the target. There will be like 4 focus tokens and two target locks to divide up as needed during the fight as well.


When done correctly, this formation offers some serious control and very reliable damage to your opponent. Now, the reason why I put Manaroo on the right side is so that she can easily bug out once she starts taking damage toward the top of the mat. 


Match-ups

Triple-D: So, the Swarm Leader Vessery Triple Defenders is very much a thing in my Northern California Meta. I have flown Jankattanni against them a few times, and the match up is hard. That being said, there is a way to play it. The hardest part is that the game usually ends up with one Defender against Zuvio or a low health Scout, and unless all munitions were fired, you probably won't get enough damage out to win the match.  

Pulling the Evade off of Ryad and Delta for the Swarm Leader + Focus + Target Lock Vessery may destroy a Jumpmaster in two rounds, but it also lets you get your munitions off and potentially take out the Delta or Ryad in one round of firing. 

Upsilon builds: With the Empire falling back on Decimators and Upsilon shuttles, there is new life for the U-Boats. It is pretty easy to get the tractor beam off, get one shield at least with Zuvio, blast the rest of them with Manaroo, and then Proton the Hull with the Scout. I need an animation of Boba Fett jumping into the Upsilon to grab Hux while he is mid fanatical speech to Omega Leader. Next turn one of the U-boats can turn and just kill its last health or two with its primary. Because of Ketsu Crew, the shuttle will have no agility for that turn as well. 

That still leaves two munitions, a bomb, and tractor beams for the remaining two ships. 

Raclo: Raclo was widely popular in my local meta before disappearing altogether. The matchup is not great, but there are some things I think you can do to make it better. One is to switch Conner Net for Cluster Mines to try and burn down the Deci faster. The next step would be to try and keep R3 with the U-boats so you could have at least have a chance of not getting Blinded Pilot. With the bomb and Zuvio's R1 shot counting for anywhere between 0-9 damage, you will probable need 2-3 munitions to get the damage out, depending on how the dice are working out. 

P.S. This is where I have been putting with Echo for anyone still trying to run her. Deci just gives pilot skill 0 to anything above an 8, and Echo is free to move about the map as she pleases. 

Parattanni: For this match up, I would honestly say just nuke whoever tries to joust you first. Getting the bomb and tractor beam tokens out will be paramount for getting ahead of the damage curve. I think the hardest part will be not taking out Fenn in one turn, or trying to chase down Asajj to close out the game. 

Take it to a tournament?

My biggest problem with this list as a tournament list is how many points everything is costing. I think if I was to run it at a tournament, I might do something crazy like drop Manaroo down to another Scout and maybe take the cheaper Sarco instead of Zuvio. That being said, the hilariousness drops down drastically by doing so. 

Wednesday, January 25, 2017

How to make a unique Mindlink list that doesn't die and fall apart immediately Pt. 2


Welcome to Part 2 of our Mindlink series. Here is part 1


What has been proven to work for Mindlink?
I think that before we start crafting our own fun Mindlink builds, we need to look at what is successful, and why it is successful. I'm going to gloss over swarms a little bit. This is not because I do not think they are great, but because I haven't spent a lot of my time playing with Mindlink swarms. Because of that, I don't feel I can speak honestly about them. 


Old Man Fennaroo


Old Man Fennaroo (I think it is actually The 186 Special) is the Mindlink list I have had the most experience playing with and against. It involves Manaroo with Mindlink+K4+Unhinged+Feedback, Fenn with Mindlink + Title + Autothrusters, and Old T with Mindlink + Title + Autothrusters. 

My favorite version of this list switches Unhinged +Feedback for R5-P8 on Manaroo. 
This list is strong, but I feel that many people don't understand why. Here is the basic order for how I run the list:
  1. Perform a green maneuver with Manaroo to get a free Target lock
  2. Barrel roll if serious danger is coming her way
  3. Focus if no danger
  4. Old T performs a green or white maneuver (lots of options)
  5. Focus if Manaroo didn't focus
  6. Reposition if able to trigger ability, or collect a second focus
  7. Fenn performs a green or white maneuver (lots of options)
  8. Fenn looks for range 1 on whatever ship Manaroo got the target lock on
  9. Fenn Barrel rolls or boosts for best position
  10. Fenn takes a focus if position is already good enough
  11. Manaroo passes focus target lock to Fenn or Old T (whoever has the best shot/needs the extra focus)
  12. Old T strips tokens off poor fool who Fenn is about to fire at
Now, the beauty of this order of operations is that there is enough flexibility to adapt as needed. Everyone could just turtle up to get 2-3 focuses (besides Man), but the extra positioning with the Barrel Roll or boost options gives the protectorates PTL quality actions with an open dial.

Why does this list work? Well, there are a lot of different things working together. The first is double auto thrusters + Extra focus tokens make Range 3 pretty safe for your aces. R5-P8 makes your opponent not want to take careless shots at Man either.

Therefore, your opponent will want to engage you at Range 2. Luckily, since no one will be getting stressed every turn, you can move at unpredictable speeds. This gives the 186 special the advantage for going to range 1. Next, if a supreme jouster like the defender tries to go for the engage, Old T offers control with his pilot ability.

The next thing is that Fenn becomes a Phantom at R1 with this build. Manaroo passes focus target lock, and he gets to throw 5 red dice and defend with 4 green. It hits very hard.

What is this list weak against? Well, without a true Palp on a list, your aces can and will suffer an unfortunate crit or get exploded in one round with some bad rolls. For an opponent, it can maximize the chances of this at range 2. Catching Fenn or Old T in arc at range 2 is perhaps the saddest moment for any 186 player.

What about stress?


People will naturally assume stress counters a Mindlink list without Palob/Guri. And, there may be some truth to that. I have played against stress, and found that it is not as bad as you would think. The main reason is that ships don't double up on stress because of Mindlink. So, you might be stressing Fenn to high heaven, but Old T is free to get some focuses for the squad. Next is that a lot of Scum ships already have great green maneuvers available to clear their stress.  I think the old school 4 ship stress control that was popular would be strong enough because it can get the bump on my focus generator while still stressing out someone else. The new three ship variant with the Arc doesn't have enough bodies on the field to control the board. That being said, it is still a hard match up for the Mindlink player, and one that you won't always win.  

Ironically, I think the biggest weakness for the 186 Special is Tie/D defenders. The ability for multiple well aimed shots lowering agility will wreck Manaroo and leave Fenn and Old T all alone in the vastness of space.


Paratanni


The Paratanni list trades the hard control of Old T for some Tanky-ness from a light Asajj and light Manaroo. Manaroo has Mindlink, Asajj has Mindlink + Latts, and Fenn has Mindlink + Title + Autothrusters.

It took me until recently to grab the shadowcaster, but I finally got some reps in with parrattoni. The list is hard to beat, and I can definitely see it doing well at a tournament. You have focus generation from Manaroo, stress control + Latts from Asajj, and the every present terrifying Fenn.

What I have learned while playing it is that Fenn is always trying to be inside Asajj's arc. That way Asajj can stress anyone who tries for a sneaky R2 shot on Fenn, and Fenn have extra guns on whatever he is going to dive and blow up.
What is this list weak against? This list is simply strong right now. I think the trick to beating this one is taking Manaroo out first (she has no teeth and can be focused fast). I would burn down Manaroo and then work to kill Asajj, leaving Fenn with only 1 action a turn.


Home-brewed lists!


I feel that The 186 Special and Paratanni are good because they don't gimmick on Mindlink, but use it to simply boost already powerful squads. I, on the other hand, have been having fun doubling down on the shenanigans part of Mindlink to some moderate success. I have settled on two favorite lists:


Defender Ender


The list is Asajj with Mindlink + Latts Razzi + Shadow Caster Title, Manaroo with Mindlink + R4 Agromech, and Palob with Mindlink + TLT

Although this list is derived from Paratanni, it flies completely different. I keep all three ships grouped up, and look to control one ship at a time. The combo works like this. Manaroo spends a focus for a target lock, and next turn passes it to Asajj. Next turn, Palob grabs a focus or evade token, Asajj fires a focus + Target Lock shot to put on a tractor beam token. Palob TLTs the lower agility ship with 1-2 focus and 0-1 target locks. Manaroo attacks and grabs a target lock for next round. Because of the tractor beam, putting someone on a rock or in a position to do it again next turn is not that hard. I one rounded a Col Vessery with this combo. 

There are a few things I like about this list. The first is that my opponents always have a hard time deciding who to kill first. Jump into range 1 to kill Palob? Fine, Asajj will start the stress train and Manaroo will get free target locks for next turn. Focus Assaj first? Fine, Palob will grab tokens every turn to turn + Manaroo will get the target locks. Same goes for focusing down Manaroo first.
Perhaps the thing I like most about this list, and the thing I like least about paratoni, is that Asajj has points for her title. Putting pressure for an opponent to dodge a primary or get tractor beamed is hilarious.


Mindlink Veterans


The list started as a joke, and has done better than I would have thought. Fenn + Old T have Mindlink + Title + Autothrusters, Guri has Mindlink + Title + FCS + Autothrusters. I fly them really close together with Guri closest to the middle of the board, Fenn closest to the outside edge of the board, and Old T in between the two. Basically, the list just wants to jump into Range 1 and see what happens. The cool thing about the list is that they all have autothrusters, so staying at R3 is pretty safe. The list would probably be eaten by many of the top lists out there, or anything with munitions, but it is a lot of fun to fly.

Final Mindlink thoughts for pt 2
After trying out some terrible lists, and tweaking some good lists to make them more fun, I have come up with some general rules for Mindlink to remember when list building.
  1. Take at least three ships with Mindlink
  2. Take Manaroo if you can. She takes Mindlink's ability and doubles its effectiveness.
  3. If you can't take Manaroo, take Guri, Palob, or Kaa'to

Thank you guys for reading!


Monday, January 23, 2017

How to make a unique Mindlink list that doesn't die and fall apart immediately Pt. 1


Like many of you that are rebelling against the defender meta, I have been playing a lot with Mindlink. These lists are an effort to bump up action efficiency for ships that generally suffer. The results are ships that have always costed just a bit too much suddenly can play ball against the strongest 2-3 ship lists out there right now.

This will be a simple two part post. Part 1 is just an introduction for newer players to the card and how to start the combos. Part 2 is an examination of what makes strong mindlink lists strong and some home-brewed lists I have made. A lot of this information will be very basic to veteran players, but it is hard to dive into content without setting a strong foundation.


Two copies of Attanni Mindlink come in the Jumpmaster5000 expansion for X-wing. So, buy two, crush your opponents at a Saturday tournament with Dengaroo, and fly casual with some Mindlink on X-wing night!

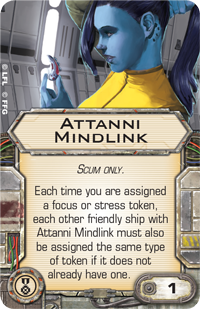
The card is simple enough. Basically, it is a binary:

  1. A ship with Attanni Mindlink gets a focus (from any source) 
  2. Every other ship with Attanni Mindlink checks to see if they also have a focus 
  3. If they do have a focus, the card does not trigger 
  4. If they do not have a focus, assign one to them


The same flowchart works for stress as well.
  1. A ship with Attanni Mindlink gets a stress (from any source) 
  2. Every other ship with Attanni Mindlink checks to see if they also have a stress 
  3. If they do have a stress, the card does not trigger 
  4. If they do not have a stress, assign one to them

The beauty of this card is that, theoretically, every ship in your list beside one gets two actions without having to stress. The downside of this card is stress management extends beyond the single ship gaining the stress.


buuuuuttttttt... Do I have to put Mindlink on every ship?

I have play-tested a fair amount with two mindlinks and a party bus or two mindlinks + other. The problem you run into is that with only two mindlink ships, your combo shuts off completely when either ship carrying mindlink is taken off. For me, I like to have at least 3 mindlinks in a list. That way the list will still operate after the first ship goes down.

The only exception I see for this would be something involving Brobots. The IG pilots and crew spend all of their points on just helping the other bro bot (because they are generally too expensive to get 3 out there), so two is all they need.

Because Mindlink is Scum only and requires an EPT slot, there are only so many ships that can take it. Before we list build, it is best to lay out exactly who can participate. Let's just start looking at the numbers:


  • Pilots that can take mindlink
    • Aggressor 
      • IG-88A (36) Unique
      • IG-88B (36) Unique
      • IG-88C (36) Unique
      • IG-88D (36) Unique
    • Firespray
      • Mandalorian Mercenary (35)
      • Kath Scarlet (38) Unique
      • Boba Fett (39) Unique
    • G-1A Starfighter
      • Gand Findsman (25)
      • 4-Lom (27) Unique
      • Zuckuss (28) Unique
    • HWK-290
      • Palob Godalhi (20) Unique
      • Dace Bonearm (23) Unique
    • JumpMaster 5000
      • Contracted Scout (25)
      • Manaroo (27) Unique
      • Tel Trevura (30) Unique
      • Dengar (33) Unique
    • Kihrax Fighter
      • Black Sun Ace (23)
      • Talonbane Cobra Unique
    • Lancer-class Pursuit Craft
      • Asajj Ventress (37) Unique
      • Ketsu Onyo (38) Unique
    • M3-A Interceptor
      • Tansarii Point Veteran (17) 
      • Serisu (20) Unique
    • Protectorate Starfighter
      • Concord Dawn Veteran (22)
      • Concord Dawn Ace (23)
      • Kad Solus (25) Unique
      • Old Teroch (26) Unique
      • Fenn Rau (28) Unique
    • StarViper
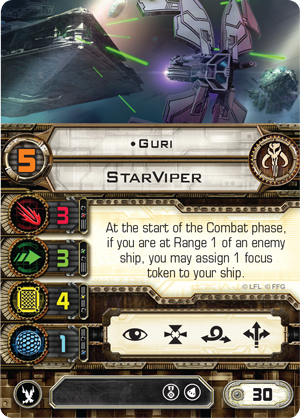
      • Guri (30) Unique
      • Prince Xizor (31) Unique
    • YV-666
      • Bossk (35) Unique
    • Y-Wing
      • Kavil (24) Unique
    • Z-95
      • Kaa-To Leeachos (15) Unique
      • N'Dru Suhlak Unique
So, there are 33 ships that can hold MindLink. There are 7 generics and 26 unique pilots. But, to make the most of the card, we want ships that can mess with focuses. That means we need to find ships that naturally pair with Mindlink.


Step 1: know your mindlink's link


Now, what actually makes these abilities so good is that they happen at the start of combat. That means that they each have a way of re-triggering Mindlink after the movement phase. 


How does this work?

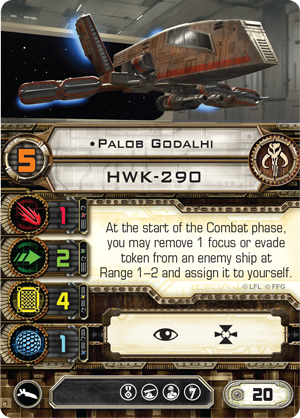
An opponent gets a series of bumps and/or control to stop Palob, Fenn, and Old Teroch from getting a focus during the movement phase. At the start of combat phase, Palob grabs a focus from an opponent. This triggers Mindlink, and Fenn + Old Teroch also get their focus. 

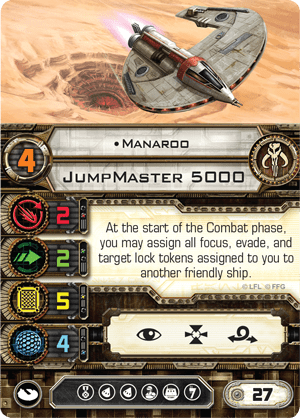
Manaroo activates Mindlink and Fenn gets a focus. At the start of combat, Manaroo passes her focus to him, giving him two, and activates Mindlink, giving her one!


That is great! How do I choose which one?

Well, I think before we can decide that we have to understand what our four friends are bringing to the table

  1. Manaroo (27): By far the strongest Mindlink support ship. Slap K4 and Mindlink for 31 points of target lock + focus passing awesome-ness. I have run her at 31-37 points, and she is always pulling her weight. Be warned, all opponents know Manaroo is the source of your power, sinking too many points into her will only result in unused points when she gets focused down and killed
  2. Palob (20): Palob is a low cost control ship that wants to steal tokens/make your opponent not take them. Palob can be run at 21-23 points (cloaking device helps his staying power) for a cheap control ship whose only job is generating focus tokens for your aces. Or, you can slap a TLT for a anti-dive mechanic to your turret list. 
  3. Guri (30): Guri is a low Pilot Skill, high cost Ace. By herself, she has proven to not be able to perform well against more efficient aces. Guri isn't someone you will usually take as your main support ship, but rather to beef up a list that wants to joust. To me, Guri would fit in well with some Protectorate Mindlinks for some fun jousting shenanigans. 
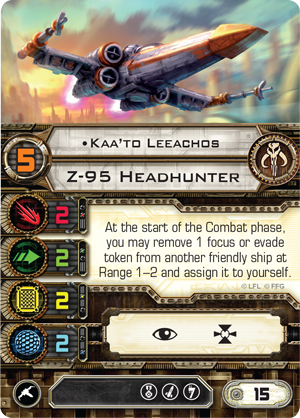
  4. Kaa'to (15): Kaa'to is the cheap Mindlink support for a 4-5 Mindlink list. he gives the ever important option of being able to replace any lost focuses in your list by taking a friendly one. By doing that, he gets at least 2 focuses and everyone in the list replenishes theirs. Slap guidance chips and munitions of choice for more opponent priority. 


Do I have to put one in my list?

I would actually say it is not necessary that every list have one of these 4 ships in it. That being said, I think each of these ships offers security to the mindlink cause. And, with their varying roles/points, you can usually find a place for one in your list. 


Step 2: Pick your list type

Let's revisit our four support ships, but make them simpler.

  1. Manaroo: 2 Ace + Support (think Palp Aces)
  2. Palob: Control lists / TLT lists
  3. Guri: Triple Aces or Guri + Support + budget ace 
  4. Kaa'to: Swarm


So, you now have a general idea of how the four different Mindlink link ships work. What are you going to fly with them? For 2 Ace + Support lists, I like to choose a pilot I have always liked, but that I felt cost too much/just didn't have the ability to compete.

For example, I think Kath Scarlet has a great ability and a ton of health, but 38 points base is expensive. I could put just Kath + Mindlink + Tail Gunner with Manaroo + Mindlink + K4 and still have 28 points to play with. Kath could have 2-3 focuses and a target lock per round, and still have the control of keeping things out of her rear arc. 


Thanks for reading Part 1! In Part 2, I will be going over different successful Mindlink lists, what makes them successful, and I'll share some fun home-brewed lists to get you going. 

Thursday, January 19, 2017

Sacramento Regional Report

Sacramento Regional Report: 
The Most Fun I Have Ever Had Playing X-Wing

I recently went to the Sacramento Regional X-Wing Tournament at Great Escape Games. Normally, I am a huge fan of Palp+Echo+Ace lists; but, my Echo has been getting wrecked by all the alpha strikes that are in the meta right now. More than that, I had gotten a little salty playing the same thing while everything around me changed. It's hard watching a good list start to fade as the meta changes. I realized that by doing so, I was just going to keep getting more and more bitter as the game and meta moved on without me. I think there is life for Echo in wave X, but it is still just theory crafting until everything is released. 

Meanwhile at a local game store in Vacaville
Over the past couple months, I had been playing against mindlink OldManFenn (186 special). What I noticed about the list was that my buddy was almost laughing every game at the sheer amount of fun he was having. I decided to give it a couple tries and was completely sold on the fun. 


Manaroo: 27
Attani Mindlink: 1
Plasma Torpedoes: 3
K4 Security Droid: 3
R5-P8: 3
Guidance Chips:0
Ship Total: 37

Fenn Rau: 28
Attani Mindlink: 1
Auto thrusters: 2
Concord Dawn Protector: 1
Ship Total: 32

Old Teroch: 26
Attani Mindlink: 1
Auto thrusters: 2
Concord Dawn Protector: 1
Ship Total: 30

List Total: 99

In hindsight, I wouldn't have put plasma torps on Manaroo because it bled my MOV and wasn't always getting fired off before she died. R5-P8, on the other hand, was a great call and just further added to the hilarious-ness of this list. 

My main reason for focusing on a fun list was that my brother was visiting from out of state, and is still very new to the game. We built a VI triple defender list and sent him on his way to being a tanky menace. 


Since I didn't have that many matches with this list (maybe 5), I wanted to come up with one opening. Basically, I slow roll and decide to move to the right on turn 3 or straight up the map on the left side on turn 4. It works by having the aces do 1 hards and barrel rolls. Man just does a 1 straight. 


1) My first match was against Matt and his Asajj + two thugs. I felt good about the match up. My plan was to take range three shots at Asajj and stay out of arc of the thugs. If Asajj wanted to come in for a r2 shot and get the stress, I would plan on boosting in with Old T and Fenn to try and blow up Asajj right then and there.

The match went pretty much that way as well. Matt flew well, and was able to get damage onto Fenn early, but Autothrusters and up to 3 focus tokens per Ace per turn is really hard to get 4 damage in 75 minutes. Matt also had extremely cold Dice. I was able to get multiple damage through at range 3 against Asajj multiple times, and his Thugs never rolled paint I don't think.

There was one point where he was able to bring Asajj around and start stressing Fenn and Old T, but she has low enough to have to spend her modifications on evades, so the tractor beams weren't landing.

Still a fun match, and we talked a few more times throughout the day.

Match won 100-0


2) By far my favorite tournament match I have ever played. Spartacus was playing this crazy Tie/D Vessery, Lightweight Frame Backdraft, + PTL Inquisitor. I felt that he had the advantage to keep R2 (where protectorates hate to be) and do all the terrible things. My plan was to get some board advantage and blow up the Inquisitor because I did not think I would be able to catch and kill him the later the game went.

We set up on opposite corners of the board, and both slow played the ever loving crap out of each other. But, it wasn't to be jerks or anything, we were more like slowly circling around the board looking for an opening to dive in. It more intents than camping or circus fires.

Eventually, we engaged as he sent all of his squad up the side of the board at Manaroo while Fenn and Old T flanked in. I think we both did what we wanted, but his positioning was better. I got damage onto Inq, and he got a lot of damage onto Manaroo. Vessery throwing out super accurate shots and giving tractor beams makes Man burn down faster than a shuttle. I wanted to trade Man for Inq, but Inq survived with 1 health (R5-P8 rolls become very interesting on 4 health ships). He escaped and left to the other side of the board. Spartacus then proceeded to outfly me and wreck my shit while I chased after Inq/did what damage I could.

the whole match was really intense, and Spartacus kept shouting about his heart. Hindsight, I think I would have approached the same way, but focused more on getting a plasma on Vessery or Backdraft and just ignore Inquisitor.

Match lost 0-100


3) I was completely drained after that last match, and I really just wanted to joust and eat lunch. My next opponent was Thomas flying Kanan+Biggs. Sadly, this list counters mine pretty hard. My Aces really want R1 to blow stuff up and survive, but autoblasters makes that a bad call. He also passed me initiative, so Rey crew would proc after Old T. Staying at R3 plinking at Biggs would take forever because of the red dice control Kanan has.

In my idiocy I decided to be unpredictable and trade an Ace for Biggs early. It worked, but the Ghost proceeded to do terrible things to me. Thomas was a strong opponent, and his list was solid.

Match loss 50-100

I was pretty spent at this point, and so was my brother. We ate some sandwiches and talked to some players to get excited about playing three more rounds.

 4) My closest match of the whole day. Dan was running Vader + RAC. I was nervous going in because he PS killed both of my ships. My goal was to burn down Race and hopefully have 2 ships left to try and take on Vader.

I traded RAC for Man, but RAC got a sweet Damaged Engine Crit off on Old T. It was terrible because I had the choice to stress my whole list or let Old T take a billion turns to turn around. I still was able to corner Vader, but some really good decisions and rolls let him limp away and take down Old T. I felt that Fenn was strong enough to close the game because of the Crits left on Vader, but time in the round was called.

Dan was an awesome guy to play with. We talked mainly about the deleted scene that had just been released of Chewie ripping off Unkar Plutt's arm and how to build lists to have fun while still competing.

Never have I been so upset that I took Plasma Torps before.

Match loss 65-67

The worst part about the whole thing is that my rookie brother played next to me and got a win, putting him just above me in the rankings. If you have a sibling who is already just a better person than you in every other way, then you know my pain.


5) My next match was against Ed and his IG-B + Bossk list. I am really glad I read about this list because it was a little tricky figuring out which attack was happening at which time 4 rounds into a tournament. I knew that if Bossk was allowed two shots against any of my Aces, that it would be over. My plan was to try and split them up, and make the alpha not as bad. I set up in the left corner, and Bossk came around the entire board to flank. While navigating the asteroids, IG-B came slightly too fast and I rushed Fenn and Old T in to get some damage off. IG lost his shields and had to bug out as Bossk came in. Bossk got a crit on Fenn, but wasn't able to kill him.

Ed and I talked a lot about MOV and points as we played out the rest of the match. It was a fun match that I think favored Ed if he was able to get that alpha off with both of his ships.


Match won 100-50


6) My last match was against Nick and his Poe, Stress-Arc, + Biggs. It is a really good list, and one that especially can mess up my mindlink. I think skill wise, Nick and I are at the exact same level, because we flew exactly the same. He played aggressive with stress and Biggs while keeping Poe safe, and I flew aggressive with Old T and Man while Fenn stayed safe. I wanted Man to take all of the stress possible, and just relied on Old T to get my focuses for everyone.

Nick's list is really strong with it's control, but it definitely struggles getting a lot of damage out. We eventually traded Biggs + Stress for Man. Old T's ability made Poe hunting him down pretty challenging. We traded Old T for some damage on Poe. Eventually we just k-turned and went for a joust to end the game. Fenn at range 1 is an absolute monster that cannot be underestimated. he was able to close out the game.

Nick was a great guy to play against. He conceded that he should have just ran and regened with Poe, but that doing so would have taken a long time and not even been a guarantee. He also said that since it was the end of the tournament, it was the most fun to try and do something you wouldn't normally do.

Match won 100-57


I ended the day 3-3. I didn't reach my goal of 4-2, but I had an absolute blast and can't recommend this list enough to try out.

Most importantly, I beat my brother.

Thanks for reading!

Tuesday, October 25, 2016

Whisper fights a TIE Swarm

Hey everyone,

I am back, and I am here to talk about the Cloak action itself, and not on Echo. To do this, I had to fly quite a few Whisper games to remember how it works. For those of you that don't know, the normal cloak action is using a 2 straight template to barrel roll or boost your ship when it decloaks.

To make sure you can cloak before your enemy fires, Whisper takes advanced cloaking device and veteran instincts. This lets her fire at ps 9 and cloaks right after. The problem this brings is that your movement doesn't function the way other ships do. In order to move, you need to decloak, let lower than ps 9 ships move, then move. So, you must really know where a ship is going in order to not get caught out.

I played a few games, and noticed a common joust that would happen against multiple lower PS skill ships. Here are my tips on surviving such an engagement.


This position doesn't look great for Whisper! But, have no fear. Although I have given up positioning to the TIE fighters, I do so to be able to gain positioning over the next three turns with little they can do to stop me. This is of course assuming the Tie swarm player is at the same skill level as me. 

We can see that Whisper has found herself straight ahead against 4 TIE fighters. Although Whisper is not in the best spot, she has at least stayed out of range 2. Assuming all crack shots aren't up, she should be okay surviving this with 0-1 shields remaining. When it comes to crack and aces, I really try to get my opponent to spend their crack on different ships. That does mean baiting multiple ships to an opponent, and sometimes ends terribly. 

Question time: which ship should Whisper attack? 

Because of FCS on Whisper, it is important to attack a ship that she will be able to attack next turn. Her attacking the same ship twice makes FCS insanely powerful. And, Whisper is rewarded for hitting an enemy with a focus token. Whisper also gets to cloak, so attacking this next turn is paramount. Because of the TIE swarms position, I would assume it will be a 3k or 4k next turn. So, I choose the lower right TIE to attack. My now singular goal is to make sure I attack him again next turn. 


I assume I can blink off one hull and then get a cloak, target lock, and focus to survive the rest of the round.


Now, I have played this set up and decloaked forward, and there is some merit to that. I would say that if I took too much damage, then I would maybe try that to run away. If you go that route, you need to decloak forward and do a 3 hard turn or a 4 straight and cloak.

I decloak up and back because I am assuming I decloaked down recently. With the decloak action, I feel you have to do something different as many times as possible, so that your opponent cannot guess and risk a block. 

If you always decloak toward the edge and 1 hard back in, your opponent will remember and block you forever.


The TIE fighters could have done a 3k instead of 4, but I don't think they would because of the risk of my getting all the way behind them. They also could break formation, but without multiple shots onto whisper, 2 dice primary will never get through by itself. Because they are stressed from the K turn, they cannot barrel roll to block me. They also only get 1 shot on me, 2 if they did something fancy. 

No matter where the Tie Fighter went that I target locked last turn, I should be able to shoot it this turn and most likely blow it up. 


Now, because the TIE fighters are stressed, I know they have to clear it or at least move forward. So, this is a great time for Whisper to become aggressive. I want to decloak right behind where a TIE fighter is. Because TIE fighters cannot stay still, I know that this spot will be open in just a second or two. If the opponent tries to do something like bump himself, you will still be behind him, and his formation will be broken the following turn. 


The opponent goes to clear stress and re-engage with all of its guns. I make my turn in and focus for a shot. 


I choose the bottom TIE fighter because I will have the easiest time chasing it down. Because I have been decloaking up with a 1 hard in, I need to change up my approach. I decloak down first. 


The TIE fighters do a 3k this time to try and finish off a most likely half health Whisper. Assuming that my opponent is setting up for me to turn in, I do a 2 straight and barrel roll away. I now am out of arc for one TIE and still maintain my shot for all the glorious actions that come with. 


When it comes to decloaking in combat with a high PS ship, always remember to:
  • Think about where your opponent will be
  • Decide where you want to go
  • Plan your decloak with all ships still in place
  • Plan your movement with your assumption most ships have already moved. 


Monday, October 10, 2016

How to: Echo and Dengaroo 1st engage

Countess Echo fights Dengaroo


Continuing on with this series on how to fly Echo, I want to focus on a simple first engagement with a list that counters Echo. To make it simple, I removed asteroids, and had the enemy's ship move last. For this post, I am going to focus on Dengaroo as he engages the castle. This match up is very hard to win against, but I wanted to show my thought process on taking a calculated risk to try and push the match in my favor. I have beaten Dengaroo a few times with it, but the possibility of him one shotting Echo is always there.


Rules for fighting Dengar:
  1. Generally, don't attack Dengar if he has arc on you
  2. Split up Echo and Ryad so that he cannot have arc on both in the same turn
  3. Take an Evade whenever possible (Dengar has Zuckass, but not 4-Lom


Turn 1: The Dengaroo approaches


I am not going to move Manaroo, but lets just assume she stays out of the fight lol. I think that is fair because that is literally all she ever does. I had Dengar do a combination of 3 banks and barrel rolls to come in at this position. It is pretty close to the three Dengar lists (2 Dengaroos, 1 other) that I have played against with my squad. 

This would be around turn 3, and if you followed my last post about castling, this is where you should end up. The bait is set for Dengar to try and get some damage on a cloaked Echo or a focus/evade Ryad. The hope is that he gets invested enough to attempt to move forward one more time before trying to turn around. 

Turn 2: Dengar takes the bait


Dengar probably was able to take off a shield on Echo or Ryad. But, now he is going to have a hard decision. Echo is going to decloak and move before he moves, and now he has stress from Zuckass. So, turning into Echo has a very low chance of getting an in arc shot on her. He also knows that Ryad is going to do a 4/5 k turn. But, there isn't a lot he could do to chase it without showing his back to Echo and Palp. The best choice would then be to try and take out Palp. 


Echo decloaks to the right and back


  1. Palp stops for a stress
  2. Ryad does a 4k for evade/focus
  3. Echo does a 3 straight for a cloak
    1. Echo decided to go straight just in case Dengar turned in or 2 slooped early. Echo then cloaked to set up for next turn. 
    2. I think, in hindsight, that it should really be a 4 straight
  4. Dengar did a 2 straight to just go for more Palp damage.
Dengar will probably put in some meaningful damage to Palp. Ryad will hopefully blink off a shield or two.


Turn 3: The kill box turns on


Now, Echo has been slowly getting into a much better position. She has potentially lost all her shields right now, though. The goal right now is to turn Palp to block Dengar from turning toward Echo, and using Ryad to block Dengar from totally escaping the box. 

  1. Echo decloaks right and in


  1. Palp does a 1 slight to clear stress
  2. Ryad does a 3 for a evade focus
  3. Echo does a 1 hard for an evade
  4. Dengar attempts a 1 hard, but bumps


Turn 4: A box that can move!


Dengar bumping Palp means that he had to switch his firing to most likely Ryad. Meanwhile Echo gets to start using her 4 dice primary to some success. 

Now Dengar has probably started to take damage; and, if I have been successful, his damage has been spread out enough to still have all of my ships. 

  1. Echo decloaks to the right and back


  1. Palp goes 1 straight to clear stress and get a focus
  2. Ryad does a 3k for a evade and focus
  3. Echo does a 1 hard and a barrel roll
  4. Dengar does a 1 hard


Turn 5: Do or die time


We are now on our 5th round of firing. At the end of this turn, I would imagine that Dengar will be critically hurt, and/or one of my ships will be destroyed

Now it is time to commit to killing Dengar

  1. Echo decloaks left and back


  1. Palp does a 2 hard for the stress
  2. Ryad does a 3 straight for a bump and evade
  3. Echo does a 1 hard
  4. Dengar does a 1 hard
    1. I'm not actually sure what Dengar would do here, so I would try to spread out my arcs enough to catch him in at least two


Final Thoughts


Dengar has had 5 shots if he got no ability shots, and I have had 7 with no ability. He has not been able to shoot the same ship every turn, and I have. His shots are still a lot more lethal than mine, so who knows what the outcome would actually be. 

Hopefully, and with some luck, Dengar would be caught in two arcs and die/run away. U boats/Zuckass of any kind are a hard match up for the phantom, but I'm hoping this post has shown how to use your two aces to make an enemy be forced into tough decisions. As for the exact decloak/movement combos, use the 2 bank back if you are flanking/chasing and use the 2 bank in if you are k turning. Every decloak is slightly different because of the obstacles present. 

In my next post I am going to talk about decloaking and moving when an enemy moves before you. It adds a new layer to movement that is very tricky, but very fun. 


Friday, October 7, 2016

Echo opening moves

Hello everyone! 

Today's post will be a step by step guide to castling with Echo, when to do it, and some general decloak tips. Here is a link to the list I have been running.  Recently, I went to a tournament and got 3rd place running this list. I lost one game, and that one was both of us down to just our Ryads, and he was much better than I. I think this list and this strategy has a lot of strength.

Opening tactics are talked about a lot in a general sense of have a plan, know if you want to joust or flank, etc. But, the only real opening tactic I see people talk about is the rule of 11, and I think it would be beneficial to start looking at specific openings for specific list types/pilots.

For those that don't know, the rule of 11 is how many spaces you and your opponent must travel before you can fire at each other. It is supremely helpful in every game you play.

In this scenario, I want all of my guns to be ready for a joust at round 3, and I want to not sacrifice the Cow's (Palp shuttle) position.

This means that the Cow cannot move too far so it can still chase later, and it means that both of my aces need to be close by.

I have used this exact opening around 20 times, and having such a specific plan has really helped me in improvising when an opponent is unpredictable in their first 3-4 turns. The general rule while improvising is that the palp shuttle stops for the stress, bumps to clear, and repeat until your frenemy dies.

Turn 0: 

Now, there are some crucial steps to making the castle work. 
  1. The first is to place an asteroid at 3 and 3 with a range ruler. This ensures enough space to own a corner of the board.
  2. Place the space cow at a 45 degree angle turning toward the asteroid. 
  3. Place your flanker (I like Ryad and Inq) up against the shuttle 
  4. Place Echo at range 3 away from the other side of the board, and facing the shuttle.

Turn 1:

Ryad's dial is going to depend largely on what your opponent is doing. For this attempt, I want to engage with all of my guns on turn 3. So,
  1. Cow dials in a 1 straight, forcing a bump
  2. Ryad dials in a 2 straight, ensuring she will not be harmed this round
  3. Echo dials in a 2 straight and cloaks


Turn 2:

Decloak:

Echo decloaks forward and to the left. 
Movement:

  1. Palp dials in a 0 stop for a stress
  2. Ryad dials in a 3 straight and uses her ability to flip 
  3. Echo does a 1 hard left and cloaks


Turn 3:

Decloak:

Echos next decloak is left and back. This puts him up against the palp shuttle
Movement:

  1. The shuttle does a 1 straight for a bump
  2. Ryad uses her ability to turn around on a 3 straight again
  3. Echo does a 1 hard to the right. He then decides to take a focus or barrel roll for the best position. 
I now enter combat of turn 3 with all of my guns facing the same direction from the corner of the map. I can now engage with a lot more flexibility than if I went chasing and had a lot of debris to worry about.

Let's say that Echo was able to get a shot, what does a normal decloak pattern look like while chasing down an opponent? 


The great thing about Echo is that she can stay on a target in one of the most unique flight patterns, so she becomes hard to predict. The strength of this list is the solid kill box that it can create and maintain. In a meta that is shifting toward firing arcs, it is more important than ever to have specific plans to maintain firing arcs on your opponent while minimizing their firing arcs on you. 


What do you think of this type of blog post? Should I work on more of these tactic breakdowns?